Fix Minolta XD11 shutter trigger issue
I found this referenced in a photo.net forum post by a user named "uconnjames" while trying to figure out problems I've been having with my Minolta XD not firing 100% of the time.
This was originally found at https://ubinet.engr.uconn.edu/zhengpeng/blog/?p=469 (dead link) and retrieved from the Wayback Machine and Translated via a whole bunch of copying and pasting with google translate so it's not the best, neither is my crappy html lol
I've included a screenshot of uconnjames's comment incase it ever goes away

Fix Minolta XD11 shutter trigger issue
Photographic equipment enthusiasts often have such troubles: they have countless classic equipment at home, but they have no time to play with them. They often worry about which camera to bring when they go out. These last night's stars, after years and months, can only helplessly lay on the bookshelf and drop ashes. One day, I was so excited that I took out my camera and wanted to show it off in front of people, but I found that it was making trouble with you. No, my Minolta XD11 stopped working, and there was no movement after the shutter was pressed. At first I thought the battery was dead, but I switched to the mechanical shutter and nothing happened. Fortunately, film machines are worthless these days, so let's take them apart. Lift up your caseback and show me your core:
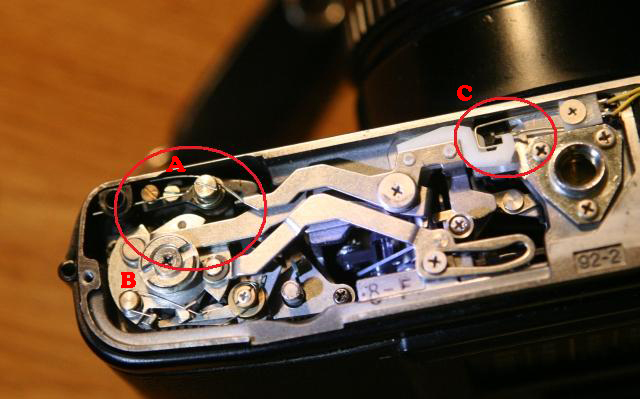
Figure 1
As expected of Minolta's last manual metal machine, the sturdy body is reassuring. Pay attention to the part circled in red in Figure 1, A is the locking mechanism of the spanner wrench. After filming, insert it into the perforation of the lower disc to ensure that the film cannot be filmed again before pressing the shutter. And the disc B guides the two metal arms (E, F in Figure 2) to realize the shutter winding, connecting the electronic shutter trigger circuit C (the red circle on the right) and the blocking of the film spanner.
Figure 2 is the appearance of the shutter after winding, remember the changes of A and C in the red circle, and draw the arc according to the same when restoring the machine. Remove the screws D1, D2, D3 in the box in Figure 2, we will isolate the mechanical connection between the film spanner and the camera, and at the same time, we can get a better field of vision, so that we can take a peek and see what the impact is trigger the shutter.

Figure 2
Removing the two metal arms E and G, we can see the three "organs" shown in red circles in Figure 3: H, I, J. Part I is used to wind the shutter. When the spanner is moved, the metal arm E in Figure 2 will push the shorter metal arm I in Figure 3 to the right to achieve the purpose of winding. The part H shown in the red circle on the left side of the figure below will be pushed to the left when the string is wound. In this way, the metal arm G at the bottom of figure 2 rotates a small angle clockwise under the action of the spring, pressing figure 2-A to lock the over-piece shaft . In addition, Figure 3-J is connected to a shutter trigger mechanism that triggers the shutter once toggled.
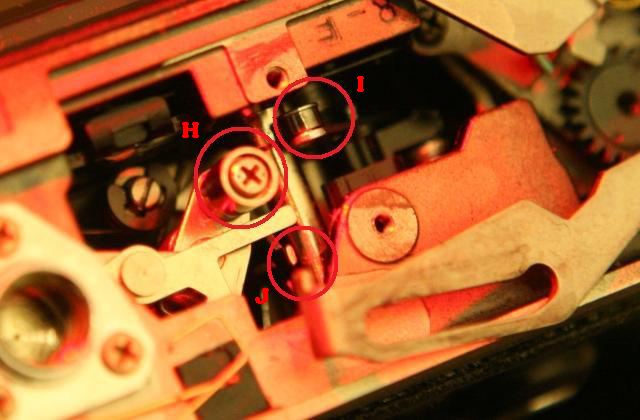
Figure 3
At this point, the working principle of the film spanner has been basically clarified. After removing the metal arm, the shutter triggering work can be completed by controlling H, I, and J individually. Specifically, first move I to the right, H to the left, and then tap J.
After playing with it, I found that the movement of H, I, and J is not very smooth. I suspect that this is the problem of the poor shutter trigger of the camera. So it is estimated that the springs (K1, K2, K3, K4) connected to them have rust or dirt and need to be cleaned and lubricated.

Figure 4

Figure 5
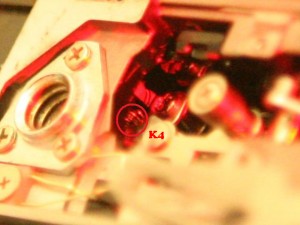
Figure 6
Find out the rust solvent used for car repair and apply it. Sure enough, the shutter can work, but there is still a short delay from pressing the shutter to triggering the shutter. Then I pulled out the lubricating oil and applied it. Dangdangdang, my XD11 came back to life and rejuvenated!
The next step is to restore the machine, reminding the orientation of the metal arm spacers in Figure 7. Also note the location of the springs in Figure 8.
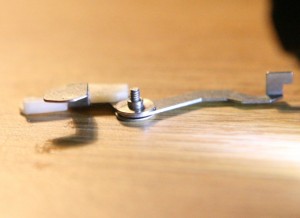
Figure 7
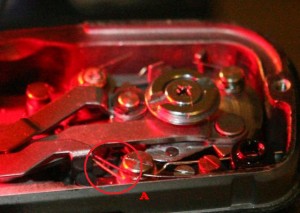
Figure 8
Practice has proved that do it yourself, well-fed and well-dressed. Problems like this are common on old machines, especially after being left unused for a long time, due to problems such as oil fume, dust, rust, lubrication, etc., which will affect the normal operation of the mechanical parts. As long as you can calm down and understand the working principle, and have useful tools at hand, it is not impossible to maintain it yourself.
A little experience, I dare not enjoy it alone, I will throw bricks here, hoping to help those in need.